As shown in the previous two entries, glass panes have a few disadvantages that might make you look for an alternative way of implementing your functionality. In our case, using glass pane for validation overlays might not be the best choice because of:
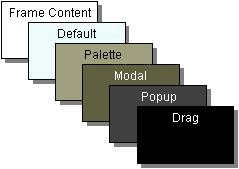
These two can be addressed by using a lesser known technique, which only now is starting to find its way into the Swing tutorials and books – a JLayeredPane. Going back to the diagrams shown in the previous entry, a root pane consists of a sequence of “layers”. The layered pane has the content pane and the menu bar (the bounds of these two are computed by the root pane UI delegate, which will be important for the next entry). The glass pane is “located” on top of the layered pane:

The layered pane itself is a sequence of layers, as illustrated in the diagram below:
In addition to the existing six “core” layers in the default implementation of a JLayeredPane, you can install your own layers at pretty much any location (in between any two core layers). For our purpose, we would want to install our validation layer between the default and the palette layers, so that it is not painted on top of other layers (such as modal, popup or drag). Note how the JLayeredPane elegantly addresses the disadvantages of using a glass pane.
First, you can have up to 99 layers in between the “adjacent” core layers. Of course you can still have different parts of your application (such as third-party libraries) try to install their layers to the same index, but at least you will be able to control the location of your own layers (something that can not be easily addressed with glass panes or repaint managers). In addition, if your layer is placed below the popup layer, it will not show the validation overlays over the lightweight popups.
The classes in this entry are located in the org.pushingpixels.validation.layeredpane package and implement the validation overlays using a custom layered pane. The implementation of a custom validation layer in ValidationLayer is pretty much the same as the first implementation of a glass pane (without the need to specially handle the lightweight popups). It recursively visits all the components in the root pane and paints validation markers as necessary. Note that as with glass pane, we are able to paint the validation markers partially outside the component bounds.
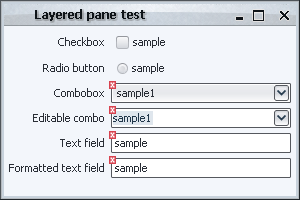
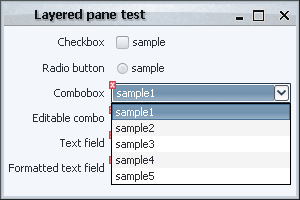
The first attempt at installing this validation layer is in the LayeredPaneSampleUiFirstTry class, and it follows this example from the Filthy Rich Clients book. We get the layered pane of the frame root pane, add our validation layer between the core default and palette layers and install the OverlayLayout on the layered pane. Here is the result:
As you can see, while the validation icons are displayed correctly, the title pane is gone. This happens because the OverlayLayout overrides the layout manager that handles the placement of title pane under decorated mode. A possible solution to this problem is implemented in the LayeredPaneSampleUi which wraps the original layout manager (that handles the title pane among the rest) and positions our validation layer to span over the content pane (but not the title pane). Here is a screenshot of the same application under this implementation:
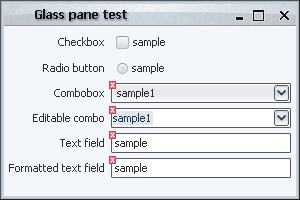
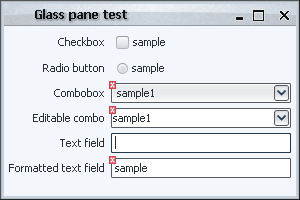
To validate that the lightweight popups are displayed correctly, here is a screenshot of the application when the first combobox shows its popup:
As you can see, implementing validation overlays using layered panes successfully addresses various issues with other techniques:
- Unlike many “component-level” techniques such as overriding paint() or using
JXLayer, it can paint outside the component bounds.
- In addition, it doesn’t require installing a custom repaint manager to extend the dirty region from an internal component to the actual container (such as editable comboboxes).
- Unlike other “global” techniques such as repaint manager or glass pane, you can have multiple layers in layered pane (one for each “task”).
- In addition, you have much finer control over where your layers”goes” (unlike the glass pane).
However, this technique as implemented in our sample code still has performance issues. Since we’re painting outside the component bounds, we install a document listener on our text fields that repaints the entire frame on each document change (since any document change may result in the change of validation status). Even if the validation layer checks the clip bounds to paint the validation overlays, it doesn’t matter much since the entire frame is repainted on every document change.
This can be addressed by repainting only the relevant region “around” the text field that will contain the actual validation overlay. While this is a valid solution, it creates an unnecessary coupling between the component and the actual implementation of the validation painting. In the long run, it adds complexity and additional level of inter-module dependencies.
A much more elegant approach is implemented in the IconFeedbackPanel class of the JGoodies Validation project. Instead of having the validation layer that paints the error icons, this panel has an actual JLabel (with the error icon) for each component that needs to show a validation error. In this case, the document listener doesn’t need to trigger the repaint of the whole frame (or even compute the extended bounds for the repaint). It just causes removal or addition of a label at the relevant location in the validation layer. The core listeners (that Swing installs on each container) then simply repaint only those controls that have been affected without repainting the entire frame. In addition, this panel overrides the validateTree() that is called internally when there are changes to the layout. In this method, the locations of all validation labels are repainted. This small amount of additional coding easily addresses the issue of repaint performance.
While up until now i have talked only about the advantages of using layered panes as compared to all the other techniques that have been discussed up until now, it is not without shortcomings. These are not specific to layered panes; rather they are relevant for all “global” techniques (including repaint manager and glass pane). Think what happens to controls that are contained in such containers as JSplitPane, JScrollPane, JTabbedPane, a panel with CardLayout or a JInternalFrame. The code needs to handle the following cases:
- The viewport offsets of scroll panes – the validation markers need to be offset as necessary.
- Controls that are located in unselected tab of a tabbed pane – the validation markers shouldn’t be shown at all.
- Controls that are located in non-fronted component of a panel with card layout – the validation markers shouldn’t be shown at all.
- Controls that are located in an internal frame which has its own layered pane and glass pane.
- Controls that are only partially shown in scroll panes – the validation markers need to be clipped as necessary.
All of these simply do not exist for “control-level” techniques such as overriding paint(), using JXLayer or a custom look-and-feel (which will be shown in the next entry). The “global” techniques must address and test these cases explicitly to ensure that there are no visual artifacts on complex UIs.
Matt Nathan has asked an excellent question in the comments section of the “Validation overlays using glass pane” entry – what happens when you have your validation field under a lightweight menu?Let’s see what happens when we click on the button of the first combobox:
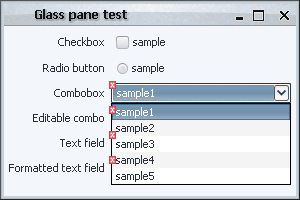
As you can see, the validation overlays painted by the glass pane are actually painted on top of the combobox popup! This is, of course, not the desired behavior, and here is a short explanation of what is going on.
As explained in Swing tutorial on root panes, a root pane consists of a sequence of “layers”. The layered pane (which i will talk about in the next entry) has the content pane and the menu bar (the bounds of these two are computed by the root pane UI delegate, which will be important for the next entry). The glass pane is “located” on top of the layered pane:
The layered pane itself is a sequence of layers, as illustrated in the diagram below:
So, where does the combobox popup “live”? It depends on whether it is a lightweight popup or a heavyweight popup. In general, a popup that is completely contained inside the frame bounds is called lightweight and lives in the popup layer of the layered pane. A popup that extends beyond the frame bounds is called heavyweight (and is implemented as a separate Window). And here you can see the reason for the incorrect behavior of our glass pane – it is painted on top of the layered pane, and hence on top of the lightweight popup layer.
One possible way to address this issue is suggested by Matt himself (and is very similar to what i did in the repaint manager entry) – go over all visible lightweight popups and adjust the clipping mask during the repaint of the glass pane. This can get especially tedious when the validation overlays are offset (as in the original glass pane implementation) and you can very quickly get lost in the implementation details.
Another and much simpler way would be to disable the lightweight popup menus by calling JPopupMenu.setDefaultLightWeightPopupEnabled(false) before showing your frame:
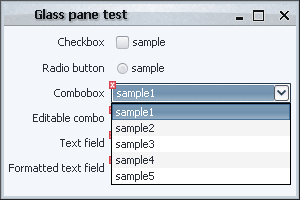
As you can see, the validation overlays are correctly painted since the heavyweight popup window (combobox popup) is painted after the frame is painted.
Note that in our particular case, the desired behavior is that the glass pane painting is done before the popups that hide the relevant controls. This is not always the case, and you might want to have glass pane painted after the popups. In such a case, you will have to provide special treatment for heavyweight popups since they live in their own top-level windows.
An additional implementation of a glass pane that respects the lightweight popup menus for our scenario might do the following after painting the validation overlays (sample implementation in org.pushingpixels.validation.glasspane.ValidationGlassPaneForPopups):
- Starting from the root pane
- Go over all components recursively
- If a component is a
JPopupMenu, is showing and is visible
- Paint it on the
Graphics passed to the paintComponent() of the glass pane
The end result should be identical to the last screenshot above. As already mentioned, this might not be the desired functionality for all glass pane usages. For example, if your glass pane shows a translucent fill with infinite progress indication, you might not want the popups to be painted with full opacity.
While the last two entries on AOP and JXLayer tried to address the immediate shortcomings of the paint() method (need for custom repaint manager and not using “pure” components), there is yet another limitation that was pointed out in the comments – what if you want to paint the validation overlay outside the component bounds? Here is a screenshot to illustrate this:
Note how the overlay icons are painted partially outside the component bounds (in this specific case, the offsets are two pixels in both dimensions), which provides a much “cleaner” view of the underlying component without sacrificing the validation icon size or opacity. So what is the limitation that we are talking about? The main reason why this is difficult to achieve with the techniques that we have seen (borders, paint() and JXLayer) is that they all are restricted to paint inside the component bounds (for more details see the JComponent.paintWithOffscreenBuffer method).
Can this be addressed? It most certainly can with techniques that operate on the “frame” level. For example, this limitation is not relevant for repaint manager since it can paint anywhere on the frame (with all the other limitations mentioned in that entry). Another frame-level technique that is available in Swing is glass pane. As i mentioned in my presentation, glass pane is a very simple and powerful technique that should be known by every Swing programmer. In one sentence, think about it as a layer that is painted over the entire frame. This means that you can paint whatever you want without being restricted by the component hierarchy or the component bounds. However, with this great power come two big disadvantages (mentioned in the introduction section of the entry on JXLayer).
The first is that when your glass pane is not opaque (as it would be in most cases since you would want to show at least some part of your application behind the glass pane), Swing has to repaint the entire frame before painting the glass pane. If you have a big frame, a lot of controls or a lot of custom painting logic, this can be very CPU-heavy process. In some cases, you might address this by taking the snapshot of your application, declaring your glass pane as opaque and just painting the application snapshot before painting the actual contents of the glass pane, but this would only work if the contents of your frame do not change as long as the glass pane is visible.
The second disadvantage of glass panes is that you can only have one glass pane installed at any given time on the specific root pane (which roughly corresponds to a window). So, if you want to use one glass pane for validation overlays (like i’ll show shortly) and another glass pane for infinite progress indication while your UI goes to the server, you’ll have to combine both painting sequences in one panel. Furthermore, you can have “rogue” third-party libraries that will install their own glass panes as the internal implementation details.
While these two issues are successfully addressed by the JXLayer implementation, it has its own shortcomings as mentioned in the relevant entry and above – you need to wrap each component with JXLayer (“tainting” you UI code) and JXLayer can only paint inside the component bounds. Note that the second limitation can be addressed in a more complicated way by wrapping the entire content pane with one big JXLayer that will paint all the validation overlays. The next entry on layered panes will show a more elegant approach to solving this problem.
The classes in this entry are located in the org.pushingpixels.validation.glasspane package implement the validation overlays using a custom glass pane. The GlassPaneSampleUi extends the basic SampleUi, adding a custom glass pane to the frame and making it visible. The glass pane itself is implemented in the ValidationGlassPane class. The constructor defines the panel as non-opaque (since we want all the components be visible “behind” the glass pane), and the paintComponent() method implements our visitor interface to paint the validation icon on relevant components with negative offsets.
There are two important points in this implementation. The first is that you need to compute the offsets between the root pane (the start of the visitor pattern implementation) and the glass pane itself (this is especially important since the implementation must run correctly under both decorated and undecorated mode). The second is the implementation itself of the visitor in the org.pushingpixels.validation.Visitor.visit method. It only paints components that intersect the current clip set by the most recent repaint event. This allows us to paint validation overlays only on the “dirty” portion of the UI. Note how in org.pushingpixels.validation.SampleUi we register a document listener on the text fields that repaints the entire frame on a document change (because in our case we want the validation overlay to be painted partially outside the text field bounds, but we don’t want to put the exact offsets in the document listener; of course this will cause the entire frame to be repainted before the glass pane is repainted, so this might be a big performance hit). Then, in the Visitor.visit we compute the intersection between the current clip and the extended component bounds. If there is intersection, we paint the validation overlay.
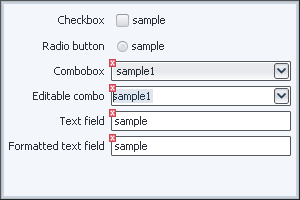
When you run the GlassPaneSample class, play with the first text field. When the contents are empty, the validation icon will not be painted:
In conclusion, you can see that a glass pane is a viable alternative to implement the validation overlays, especially when the the icons need to be painted partially outside the component bounds. While with proper coding of intersections with clipping area you can address the performance issue of the glass pane itself, the issue of repainting the entire underlying frame remains. In addition, we’re still using the global glass pane resource. The next entry on layered panes will address the later issue.
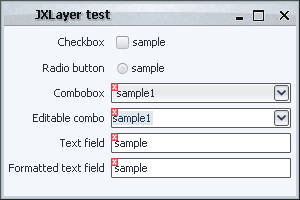
To continue addressing the disadvantages of overriding paint() for showing validation overlays, this time i will talk about the JXLayer component. Developed and maintained by Alexander Potochkin, it is one of the most versatile Swing utilities that i have seen in the last two years. One of the next entries will talk about using a glass pane for validation overlays; it will also mention the two main disadvantages of glass panes
- You can have only one glass pane for a top-level window (flexibility)
- When glass pane is repainted, the entire frame is repainted with it (performance)
The best way to describe JXLayer in one sentence would be that it provides the functionality of a glass pane on the component level. While addressing both disadvantages of glass panes, it also has advanced APIs to set custom alpha value, install filters and support non-rectangular components. What does this have to do with validation overlays?
Using JXLayer allows us to address one limitation of directly overriding paint() – we don’t need to install a custom repaint manager to extend the dirty region from an inner component to its containing complex component (say, from the inner text field to the containing editable combobox). Note that the second limitation (not using “pure” core components) unfortunately remains.
All classes in this entry are located in the org.pushingpixels.validation.jxlayer package. The JXLayerComponentFactory provides a custom painter for JXLayer that paints the component itself and the validation icon if necessary. In addition, it provides a utility method to “wrap” any JComponent with our custom JXLayer. The JXLayerSampleUi creates the UI itself – note that instead of adding “regular” components (such as JTextField or JComboBox), it wraps them with JXLayers and adds those (much as you would add a JTable wrapped in a JScrollPane, so the notion is not completely foreign to a Swing developer).
The biggest gain from using JXLayer in our example is that there is no longer need for a custom repaint manager. Since it wraps our component with an additional “glass sheet”, Swing knows that it needs to repaint the entire component when any of its parts is dirty. Since we’re operating on a single component (and not on the entire frame as glass pane does), the performance penalty is more than acceptable (remember that repaint manager is a global resource, so not having to install one is a very good thing). Here is how our UI looks like under JXLayer: