With the “Filthy Rich Clients” book just around the corner, the co-author Romain Guy was gracious enough to answer a few questions that i had about the book and the related topics.
Whose idea was it to write the book?
Chet came up with the idea. Chet loves to write and his wordy, yet, rare, blog entries are a good giveaway. That Chet wanted to write a book seemed quite natural to me. Because I also really enjoy writing, I translated a few books for O’Reilly and wrote a couple hundreds articles for technical magazines, Chet offered me to co-author the book. Besides, our skills are very complementary. Chet takes care of the technical groundwork and the jokes while I handle high-level effects and visual stuff. He knows how to write code, I know how to use Photoshop.
How much time did you spend on writing your part?
It’s hard to come up with a precise answer. My writing spanned over about 4 months, during which I was quite busy with school and exams. I spent long periods without writing anything and did most of the work in short but intensive bursts. That’s how I always worked but it drove Chet insane. He was quite worried at times but we delivered in time.
Did you use any special collaboration tools on those chapters that you wrote together?
Unfortunately, no. I have used Subversion and CVS in the past for that kind of work, but we relied entirely on Word’s tracking system, IM (a lot) and email (gazillions of emails were exchanged.) We did not bother much with collaboration tools because we worked separately on chapters. Only chapters 2 and 5 contain text that we both wrote. However, I was worried about losing work when trying to merge the files we exchanged by email. Actually we made a mistake once and almost lost a bit of work; good thing I have two daily external backups. And I know that for our next book we will use plain text and Subversion.
How did you decide on what goes in the book and what stays out?
That’s quite easy. Everything went into the book, nothing stayed out. As I said earlier, Chet and I are quite experienced writers. Besides, we thought hard about the content before starting writing the first pages and it was very clear to use what the final content would be. We did shuffled chapters around but we didn’t have to suffer from any cut or large addition.
How did you handle the inherent restrictions of the printed format for such a dynamic area as animations?
One of our recurrent jokes was to print an animation’s frames in the corner of the pages and use the book as a flip-book. From the beginning we knew that the book would have a companion site with all of the source code. We also simply decomposed a few animations as a series of screenshots or diagrams in the book. While it doesn’t look as good as the real animation, it does an excellent job at showing precisely what happens on screen.
Do you see value in writing books in the blog era?
I definitely do. Even though I spend a lot of time every day reading blogs and online articles, I always find it tedious to read on a screen. Blogs also tend to focus too much on details or, on the contrary, do not delve enough into the details. This is very valuable but a book is always, to me, a better asset when I need to learn about a technology or a topic I know nothing about.
I know that glass panes were your favorite technique once. Has this changed?
I would say that my favorite technique was and still is @Override protected void paintComponent().
What are your top three wishes for the desktop APIs for the next JDK release?
I am pretty happy with the APIs as they stand now. That said, I’d love to see non-rectangular windows, lightweight/heavyweight integration (which would bring video, 3D and 2D together) and something like SwingX‘s painters.
What are the top three desktop APIs that you wish never existed in the JDK?
One is obvious, AWT. Just because I’m tired of explaining on forums that you should not use Canvas and Button but JComponent and JButton. And it has nothing to do with Java, but I have a profound dislike for Tk and wxWidgets APIs.
What other non-Java desktop toolkits do you use? What can Swing learn from them?
I used Tk, wxWidgets and QT quite a lot in the past. I am particularly fond of QT, even though it’s far from perfect. Nowadays, I also enjoy working with Cocoa. The interesting thing about those toolkits is very often the ease of use. Their architecture is not always very pretty but you can get things done with them very quickly and they are easier to apprehend. I don’t think Swing could learn anything from them since it’s too different and too complex now. However, Sun could learn from them for a possible new toolkit; it’s all about ease of use and making common use cases easy to implement. Desktop Java developers could learn from those toolkits. For instance, I am fond of Cocoa developer’s use of images. Instead of tinkering with drawing APIs for hours to create a nice looking widget, they just stitch a few images together. It’s simple and efficient.
Would you take this book with you to a deserted island?
No, I’ve read it so many times that I know it by heart now.
Would you take Chet with you to a deserted island?
Only if I can also bring a typewriter to keep him busy and prevent him from telling me his jokes.
Do you actually like Chet’s jokes?
I actually do like them a lot!
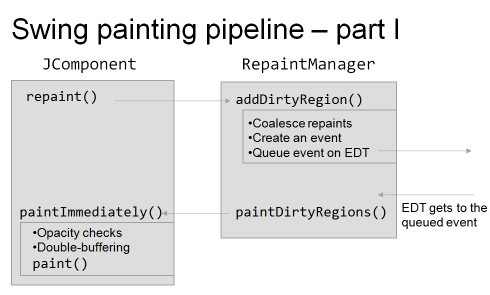
Over the past two weeks i have presented a few solutions to paint validation overlays in Swing. The sheer variety of the solution spectrum serves to highlight the extensibility of the Swing painting pipeline.
As can be seen from even such a simple example as validation overlays, there are many ways to achieve the desired functionality in Swing, each one having its advantages and disadvantages. This variety is, perhaps, Swing’s biggest blessing and biggest curse. On one hand, if you know how Swing works, you can achieve almost everything. On the other hand, if you’re a novice developer, it’s just too much to handle.
In addition, you need to be fully aware of the limitations of each technique to choose the one that best suites your needs. There is no single silver bullet that works best for all requirements, and in most cases the best solution would be a combination of two or even more working together. Hopefully this series has helped you put a few more tools in your developer arsenal. So the next time you need to provide some custom painting functionality, look at the Swing painting pipeline, weigh all the options and go with the one that would work best for your specific requirements.
To sum up, here are the links to all the entries:
- Repaint manager
- Overriding paint() manually
- Using AOP to override paint()
- Custom border
- Layered pane
- Glass pane
- JXLayer
- Extending look and feel
- Multiplex look and feel
Perhaps one of the bigger disadvantages of implementing the validation overlays by extending a specific look and feel is that this technique effectively locks your application into that LAF. While this can be addressed with complicated bytecode injection techniques that might fail under different LAFs, isn’t there another way to add the validation overlay as a simple “add on” on top of any LAF? In this entry we will look at a solution available in the core Swing package – a multiplexing look and feel.
Available from as far back as JDK 1.3, the MultiLookAndFeel class sounds like a perfect solution to our problem. Reading the documentation of this class promises a nice and clean solution:
A multiplexing look and feel [addresses] both these problems simultaneously because it allows multiple look and feels to be combined. The first problem (having to use what amounts to a second copy of the same code) is solved because the developer can create a specialized look and feel that can then be combined with other look and feels. The second problem (having to force the use of a particular look and feel) is solved because a specialized look and feel can be used with whatever default look and feel the application may have locked in place.
With all this promise there are surprisingly few examples of using multiplexing LAF (even given that it has existed for quite some time now). First, you can read this thread on java.net dating back to 2005 (especially the remarks from then-Swing architect Scott Violet). Second, note how this bug is still open after two years. In this entry i’m going to show just a few deficiencies of the multiplex LAF implementation and why you should stay clear of it in most cases.
The classes in this entry are located in the org.pushingpixels.validation.multilaf package and implement the validation overlays using a multiplex LAF (on top of the Substance LAF). The first implementation takes off by learning all the mistakes from the previous entry – using custom borders and special handling of inner text fields for proper overlays. The ValidationTextFieldUI and ValidationComboBoxUIFirstTry do just that. Then, we set Substance as the “main” LAF and add our “validation” LAF (that has these two UI delegates) as an auxiliary LAF (you can have more than one). Here is how our application looks like:
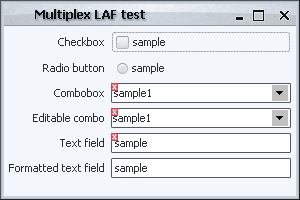
As you can see, the combobox buttons are clearly not coming from the main LAF. What is going on? Our combobox UI delegate extends the BasicComboBoxUI (so as to allow us to add the validation overlay functionality to any LAF). The arrow button is part of the internal implementation in the UI delegate and is created by the createArrowButton(), which is called from the installComponents(). So far so good, since this is how a combobox UI delegate that extends the basic implementation works. The problem with the MultiComboBoxUI is that it invokes the “lifecycle” methods of the installed UI delegates starting from the main LAF. And so, the MultiComboBoxUI.installUI first calls SubstanceComboBoxUI.installUI (which calls SubstanceComboBoxUI.installComponents which calls SubstanceComboBoxUI.createArrowButton), and then calls the ValidationComboBoxUIFirstTry.installUI (which goes through the same sequence of steps, eventually calling the BasicComboBoxUI.createArrowButton). And so, the arrow button installed by the main LAF is effectively uninstalled by our extension without it explicitly doing so. Note that this would happen under any other LAF; it’s not Substance-specific.
With this very technical detail exposed, our second try in ValidationComboBoxUISecondTry is to override the createArrowButton() and return null. Not only this adds an unnecessary implementation complexity to our class (which has absolutely nothing to do with validation overlays, by the way), it also results in a nice NullPointerException when BasicComboBoxUI.installComponents() tries to add the null result to the combobox. Obviously, the core Swing implementation of multiplex LAF was never tested under such a simple scenario as adding custom painting to comboboxes.
Our last try is in ValidationComboBoxUI which has to use very “brittle” techniques to preserve the original button appearance. It overrides the createArrowButton(), iterates over all UI delegates picking the one that doesn’t come from our auxiliary LAF, finds its createArrowButton() using reflection (since this method is protected), marks it as accessible and calls it using reflection. Obviously, this is not the best thing to do – the reflection might fail under a stricter security manager and the code is ugly and difficult to refactor.
Here is how our application looks now:
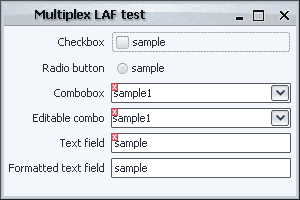
Although the combo buttons look consistent with the application, note how they are four pixels wider than they without our auxiliary validation LAF (18*15 instead of 14*15). What does this mean – yet more exploration of the combobox UI implementation to find which method is responsible for computing the button bounds and, perhaps, yet more unnecessary and unjustified overriding of methods that are not related to our functionality (with possible use of reflection).
So, as you can see, the multiplex LAF is one of the worst techniques that you can choose for the validation overlays and pretty much for any other paint-related functionality. It’s a real pity that after seven years this functionality remains in such unfinished state.
With the last few entries essentially using the same part of the Swing painting pipeline (overriding or extending paint() in one way or another), it’s time to continue along the pipeline. In this entry i’m going to talk about the using the UI delegates to show validation overlays and the various issues with this approach.
In general, almost all parts of core Swing components are painted by the UI delegates. A UI delegate is a class that is responsible for painting a specific class of Swing components. For example, JButtons are painted by the ButtonUI delegate, JSliders are painted by the SliderUI delegate and so on. Together, UI delegates form what is called a look and feel. There are a few core LAFs (such as Metal / Ocean, Windows, GTK, Motif, Synth and the upcoming Nimbus) and about 15-20 third-party commercial and open-source ones (a comprehensive list is available at javootoo.com). While in general almost everything is painted by the UI delegates, this does not automatically mean that they are the best answer to all problems, and i’m going to address different LAF-related issues in this entry.
The classes in this entry are located in the org.pushingpixels.validation.specificlaf package and implement the validation overlays using a custom look-and-feel that extends the Substance LAF. In general, you would have to extend a UI delegate for each one of the component classes that can have validation overlays.
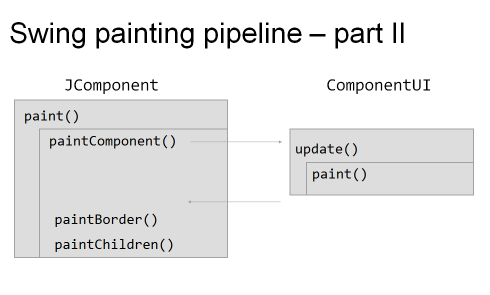
Our first attempt is straightforward -all the UI delegates inherit the update(Graphics g, Component c) method from the common base ComponentUI class. This is the method that is called in JComponent.paintComponent() to paint the actual component. In our ValidationComboBoxUIFirstTry and ValidationTextFieldUIFirstTry we override the update method, call the super implementation and then paint the validation icon. Here is the screenshot of our UI:
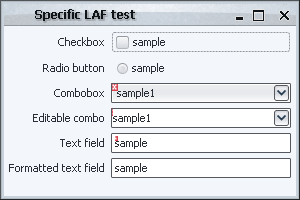
Obviously, this is not what we want. What is happening here? For starters, look at the second part of the Swing painting pipeline – after paintComponent() is done, Swing calls paintBorder(). This effectively means that the component border will be painted after the UI delegate is done painting the component. See what happens with the top (non-editable) combobox and the first text field – the validation error is partially overdrawn by the component border. How can we address this problem?
Unfortunately, the solution is not on the pure look-and-feel level. We have to install a custom border in much the same way as discussed in the section on borders. The advantage of doing this on the LAF level is that the application UI creation logic remains the same – the borders are installed by the UI delegates of the relevant components. As mentioned in the section on borders, the current core implementation of the Swing pipeline allows the paintBorder() method to paint in the entire bounds of the component (doesn’t install a custom clip that matches the border insets). So, let’s see how our application looks like under the ValidationComboBoxUI and ValidationTextFieldUISecondTry:
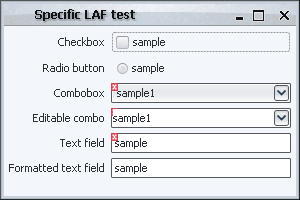
The first combobox and the first text field look as expected. What about the second (editable) combobox? As already mentioned, an editable combobox is implemented with a text field and a button. These are painted in the paintChildren() method, which is called after paintComponent() and paintBorder() are done. And so, the inner text field of the editable combobox partially hides the validation icon painting of the “container” combobox. How can this be addressed?
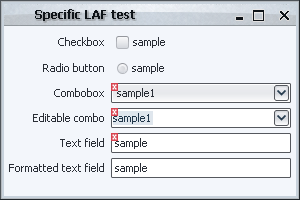
The ValidationTextFieldUI overrides the update() method in addition to installing a custom border. While the border is painting the validation overlay on regular text fields, the update() method traverses the component hierarchy, checks whether the current parent needs to show a validation overlay and if so, paints the validation icon offset to the parent coordinates. Here is how the application looks now:
And now that we have seen how the validation overlays can be achieved by extending a look-and-feel, i’ll talk about the good and the bad sides of doing so.
By doing the custom painting on the LAF level you’re decoupling this functionality from your main application. In addition, you would be able to reuse this LAF in another application. On the other hand, there are many shortcomings to this approach:
- By extending a specific look-and-feel, you’re binding your application to it. While this can be addressed with bytecode modification (injecting the required functionality into any core or third-party LAF either offline or in the classloader), doing so is very complicated, might not work on LAFs that don’t follow the usual painting cycle (such as WinLAF or Synth) or not feasible (such as changing core LAFs in the classloader).
- Much as with repaint manager or glass pane, you can only have one active look-and-feel at any given time. If you need to implement additional functionality using this approach, the code becomes much less reusable and maintainable. The multiplex look-and-feel that i will talk about in the next entry brings more problems than it solves.
- The LAF operates further along the way of the Swing painting pipeline than what is needed for this specific functionality. This makes the implementation more complicated by explicitly handling the borders and internal components. In case of borders, this might interfere with existing application logic when property change listeners will be activated on changing the border.
- As with other component-level techniques, we still need to install a custom repaint manager that expands the dirty region from an inner component to the actual component that shows the validation overlay. This can be addressed by firing a repaint event whenever such an inner component is repainted (to repaint the parent component). The implementation needs to make sure that there is no infinite repaint loop. In addition, since the repainting in Swing is asynchronous, you might end up with temporary visual artifacts.
- You need to provide a UI delegate for every component class that can have validation errors. As seen in the examples above, some of these UI delegates will have to provide a complex logic for painting the validation overlays. In addition, some of them will have to take into account rather “extreme” cases such as using unusual components in the combobox editor (that can take any component). So, the code that we have seen in the last version of the text field UI delegate will have to be replicated for a lot of other controls (especially if you’re planning to ship such a LAF as a standalone library that is not specific to one of your applications where you have complete control).
The next entry will talk about the multiplex look and feel that is trying to address some of the problems mentioned above, but brings even more problems with it.
